This time we will talk about how to reflash your ESP Module with a different firmware and how can be done using a CBDB setup, easy as "just insert a yellow jumper" story.

As you remember from the previous part, the ESP-07 module that I have received was already programmed with the AT firmware. Great piece of code, indeed, but I really think a more flexible and standalone mode of usage will go better with out CBDB Setup. You will be amazed what kind of applications can be done using CBDB only and how easy has become in the IOT world this days. I remember doing someting similar 15 years ago ... you don't want to know the complexity and the cost just to turn On/Off via Internet some remote Power Sockets.
For this reasons we will use for further projects, examples and tests, NodeMCU, a LUA based interpreter that runs directly on ESP8266. What that mens? Means a flexible language, event-driven advanced API for hardware IO and network applications, standalone operation of the ESP module, the "bread-and-butter" thing that was missing to our "ghetto-style" setup :).
What we will use in this process:
- CBDB board (As prepared in the previuos part)
- USB adapter (take a look on Part 1 for details how to connect them together)
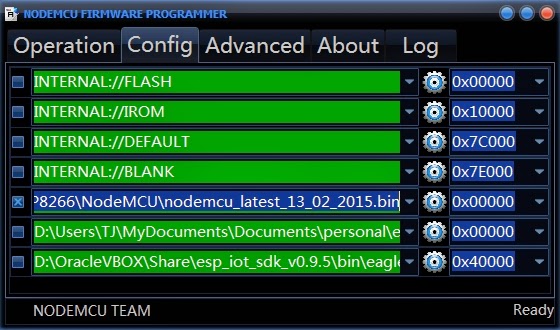
- NodeMCU firmware (download latest - it's the floating point version for now)
- NodeMCU Flasher ( firmware programmer for NodeMCU DEVKIT)
BUT take a look to my previous post about NodeMCU Flasher. It's some sort of price that you will pay. Keep in mind that you have the source available. Open "UnitFormMain.pas" file and search for "www.vowstar.com/lambdadriver/". Now it's at line 959. Might vary in the future.
If you don't like the fact that is trying to access Internet, just remove from code related lines and recompile OR quick-and-dirty style, just block NodeMCU Flasher program from your computer Firewall for any outgoing trafffic. You are keeping full control of your Outgoing traffic from your Computer, don't ya? :)
<paranoia mode on>I don't want my fridge to start speaking with chinese girls without my knowledge. Any girls, to be politically correct. Or boys. Even more correct. lol. </paranoia mode>
With all the pieces in place, flashing the module is straings away:
- connect CBDB Module with the USB Adapter, Set the PROG jumper in the Programming mode position (closed) and power on

- start NodeMCU Flasher. Choose you USB adapter corresponding port

- add from Config Menu latest previously downloaded firmware. It must start from 0x0000. Disable anything else.
- Go back on Operation tab. Power off your CBDB Module. Press FLASH Button. power ON quick CBDB module. It will be recognised and will start flashing. Give it a second try if necessary.

- When finished succesfully A green OK checkmark will appear

Power Off CBDB Module, Remove yellow jumper. Power back ON. You are the proud owner of a NodeMCU programmed module.

For further programming in LUA, it might be possible to do it directly in your Serial Terminal Program but I will recomend you to use a more dedicated program for that, like LuaLoader or LuaUploader. I will stay with the latest one, for it's great flexibility and simplicity.
 | |
| This is how it looks when opening LuaUploader and reset your CBDB Board |
- To quick setup your WIFI network :
wifi.setmode(wifi.STATION)
wifi.sta.config ( "YOUR_WIFI_SSID" , "PASSWORD" )
print(wifi.sta.getip())
- For the Blinky test, just use a prepared LED as in the picture, insert it on yellow jumper place and run de modified code from below
 | |
| Please check Anode/Catode of the LED |
timerId = 0 -- we have seven timers! 0..6
dly = 500 -- milliseconds
ledPin = 3 -- 3=GPIO0
gpio.mode(ledPin,gpio.OUTPUT)
ledState = 0
tmr.alarm( timerId, dly, 1, function()
ledState = 1 - ledState;
gpio.write(ledPin, ledState)
end)
 |
| Select the Blinky piece of code that you want to run and press "Execute Selection" button. |
2 comments:
Hi,
I bought the devkit 1.0.
Why do you flash it?
What is the state of the kit out of the box? Is it dedicated to work with certain software or it has no bootloader so you flash it to upload the basic firmware?
Do you mean NodeMCU Devkit 1.0? If it has already NodeMCU on it you don't need to reflash it until you need a few firmware version or bugfix version. The above process is for ESP 07-12 Modules received with AT firmware on it.
Post a Comment