Showing posts with label Breadboard. Show all posts

Thursday, September 29, 2016

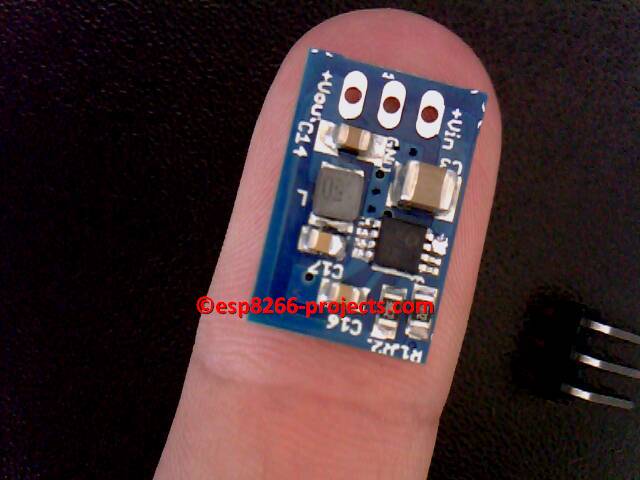
30V Synchronous step-down DC-DC converter


A compact breadboard friendly power module for your ESP8266, Arduino, ARM, PIC, etc project :


AVAILABE on TINDIE Store !! https://www.tindie.com/stores/nEXT_EVO1/

30V max Input, DC-DC High-Efficiency Step-down regulator, the perfect drop-in replacement for standard Linear regulators: LM7805,LM317 or similar.


And the story behind:

   I was looking for a drop-in replacement for some standard linear regulators in existing equipment that heats badly because of to small heatsinks and some poor design. Available space inside was way to small to install a bigger heatsink on most boards.

   Impressed by the results, have started using it almost everywhere where I need a good Voltage Regulator, so ended up as a standard used regulator module. If you need a nice and stable Voltage Regulator for your projects, you might found it!


  FEATURES: 
  • Up to 95% Efficiency
  • Input Voltage Range: 4.4V to 30V
  • Output Voltage Range: 2.0V to 24V (changing the divider resistor, by default comes configured for 3.3 or 5V, as you choose)
  • Output Current - 0.65A max in actual configuration - upto 1A with extra cooling.
  • Automatic Pulse Frequency Modulation/Pulse-Width Modulation (PFM/PWM) Operation
  • Low Device Shutdown Current: 3 μA typical
  • Low Device Quiescent Current: 44 μA (non-switching, PFM Mode)
  • Internal Compensation
  • Peak Current Mode Control
  • Cycle-by-Cycle Peak Current Limit
  • Undervoltage Lockout (UVLO): 4.1V typical to start 3.6V typical to stop
  • Overtemperature Protection
  • Thermal Shutdown: +150°C +25°C Hysteresis
 ...plus many more. For more details please take a look at the Datasheet.


  SCHEMATICS:


Creative Commons License
All Projects, Software, Hardware, Articles, etc released by ESP8266-Projects.com are licensed under a Creative Commons Attribution-NonCommercial 4.0 International License. 


Wednesday, March 25, 2015

Mailbag Arrival !! New ESP8266 Adapter board


New goodies hit my MailBox, this time from Singapore :


   Let's see what's inside.
  • Short but nice documentation including, schematics, pinout, configuration:

   YES! It's a new breadboard adapter for ESP-07 or ESP-12 ESP8266 WiFi module, designed by
    Baoshi 
  • a box containing the module nice packed in antistatic bag.


  • Actual module zise vs. the printed A4 documentation
ESP Adapter Module Pinout

A closer look:

TOP
Bottom
Onboard 3.3V power regulator - AMS1117


ESP Adapter board modules are about16mm tall, easily occupies 6 rows (3 rows on each side) on a Breadboard:


Features

  • Easy breakout of all ESP07/12 pins
  • Custom designed pin headers take minimum real-estate on breadboard
  • Plug-n-play solution. No external pull-up / pull-down resistor necessary
  • One button reset/program mode selection (short press for reset, long press to enter program mode)
  • On-board 3.3v regulator with appropriate heatsink
  • On-board UART (UART0) connector with FTDI Basic compatible pinout for easy programming and debugging

All the shematics and related informations are released under CC-0 Licence and can be found on GitHub: https://github.com/baoshi/ESP-Breakout

ESP Adapter Board Schematic

    One thing that definitely worth to mention is the clever way to combine RST and GPIO-0 pins signals to obtain the desired boot sequence modes during power on or reset with just one switch (SW1)

   How it works:

   During idle state, internal pull-up in the ESP8266 RESET pin turns on Q1. Q2 cut off so GPIO0 remains high due to GPIO0 internal pull-up. At the same time, C1 discharges from R2 and Q1. When user presses SW1, RESET goes low immediately. Meanwhile, Q1 turns off and 3.3V power charges C1 through R1 and R2. If user releases SW1 quickly and the voltage across C1 has not reached Q2′s threshold voltage, Q2 remains off and ESP8266 enters normal running mode. However if user holds SW1 long enough before releasing, Q2 will turn on, pull GPIO0 low. At the moment user releases SW1, RESET goes high but GPIO0 will be held low for a while due to C1 have to discharge through R2 and Q1. The choice of C1 and R2 are such that it keeps GPIO0 low long enough for ESP8266 to enter program mode."

SW1 Select circuit

  Different boot modes during power on or reset:

  Boot Mode   CH_PD   GPIO15   GPIO0
  Run firmware   High   Low   HiZ (Internal P-UP)
  Flash firmware   High   Low    Low


  Let's run a first test on it !

  Plug in the On-board UART (UART0) connector the USB adapter, 74880bps, 8N1, no handshake, choosing the right corresponding port. Be sure that is a 3V compatible one!! 5V logic levels might hurt badly your ESP8266 Module!

ESP8266 Module Boot message

It's Allive !! :)


 Let's burn some LUA flavour on it as explained previously for CBDB DevBoard and run some more tests.

NodeMcu Programming successful


For programming and uploading the software we will continue to use the LuaUploader as before:


Blinkie is BACK :)

And a short video showing the NodeMCU Firmware upload process and first run Blinkie test: