Showing posts with label Thingspeak. Show all posts

Wednesday, November 4, 2015

Raspberry PI2 + Thingspeak on JESSIE


   This is a follow-up for the previous Raspberry PI2 - Standalone Thingspeak server installation

   Because many people have encountered lots of issues with the installation, mainly r8188eu WIFI chipset driver issues or strange compile problems, I was thinking to give a chance also to the new RASPBIAN Jessie, maybe it might be possible to make life easier for many of us.

   The setup environment remain the same, same remain the SD Card flashing process, so please take a look first at : Raspberry PI2 - Standalone Thingspeak server installation

   First thing: because I use RPI2 board headless, I have disabled the new default boot to graphical interface that Jessie has, CLI is more than enough for me.


   GOOD NEWS!! The issue with the r8188eu WIFI seems to be solved. At least my dongle worked this time out of the box, nothing fancy to be done anymore.


   Below is the full transcript of a Thingspeak Server installation process finished about 30 min ago, using a fresh new RASPBIAN Jessie image:


System Update & required packages install

  • Switched over to SSH remote access with Putty - accept new key
  • Change "pi" account password:
                  pi@RPIMON1~$passwd
  • Set ROOT password, so you can then use root (just for very, very special things!)
              pi@RPIMON1~$sudo passwd root
  • System Update & upgrade  :
              pi@RPIMON1~$sudo apt-get update            
              pi@RPIMON1~$sudo apt-get upgrade          
              pi@RPIMON1~$sudo apt-get dist-upgrade   
              pi@RPIMON1~$sudo sync

  • Reboot:
            pi@RPIMON1~$ sudo reboot
  • INSTALL Required packages:
           pi@RPIMON1~$sudo apt-get -y install build-essential git mysql-server mysql-client 
                                       libmysqlclient-dev libxml2-dev libxslt-dev libssl-dev libsqlite3-dev  

 MySQL Database configuration

    pi@RPIMON1~$mysql --user=root mysql -p useyourpasswd here
    pi@RPIMON1~$mysql> CREATE USER 'thing'@'localhost' IDENTIFIED BY 'speak’;
    pi@RPIMON1~$mysql> GRANT ALL PRIVILEGES ON *.* TO 'thing'@'localhost' WITH GRANT OPTION;
    pi@RPIMON1~$mysql> commit;
    pi@RPIMON1~$mysql> exit;


Ruby / Rails install

          pi@RPIMON1~$wget http://cache.ruby-lang.org/pub/ruby/2.1/ruby-2.1.5.tar.gz
          pi@RPIMON1~$tar xvzf ruby-2.1.5.tar.gz
          pi@RPIMON1~$cd ruby-2.1.5
          pi@RPIMON1~$./configure
          pi@RPIMON1~$make


MAKE RESULT:

  Files:        962
  Classes:     1414 ( 566 undocumented)
  Modules:      268 (  87 undocumented)
  Constants:   2098 ( 624 undocumented)
  Attributes:  1146 ( 272 undocumented)
  Methods:    10651 (2228 undocumented)

  Total:      15577 (3777 undocumented)
   75.75% documented

  Elapsed: 812.6s
 

(That means you need to be VERY patient thru the entire process ! :) )


          pi@RPIMON1~$sudo make install
          pi@RPIMON1~$cd ..
          pi@RPIMON1~$echo "gem: --no-rdoc --no-ri" >> ${HOME}/.gemrc
          pi@RPIMON1~$sudo gem install rails


THINGSPEAK SERVER INSTALL

    pi@RPIMON1~$git clone https://github.com/iobridge/thingspeak.git
    pi@RPIMON1~$cp thingspeak/config/database.yml.example thingspeak/config/database.yml
    pi@RPIMON1~$cd thingspeak
    pi@RPIMON1~$bundle install
    pi@RPIMON1~$bundle exec rake db:create

   
Check MYSQL DB:

    pi@RPIMON1~$mysql --user=root mysql -p
    pi@RPIMON1~$mysql> show databases;

#+----------------------------  +
#| Database                        |
#+----------------------------  +
#| information_schema        |
#| mysql                              |
#| performance_schema      |
#| thingspeak_development |
#| thingspeak_test               |
#+------------------------------+


     pi@RPIMON1~$mysql> exit; 

IF MYSQL DB OK  then :

     pi@RPIMON1~$bundle exec rake db:schema:load


 RUN the THINGSPEAK SERVER:

    pi@RPIMON1 ~/yourthingspeak $ rails server webrick.


 That's it! Prepare yourself for about 4 hours of patience :)

 Waiting your feedback about!


Wednesday, May 27, 2015

Raspberry PI - Standalone Thingspeak Server installation


UPDATE !! UPDATE !! UPDATE !! UPDATE !!

New fresh install instructions based on the new RASPBIAN Jessie: Raspberry PI2 + Thingspeak Server on RASPBIAN Jessie

-------------------------------------------------------------------------------------------------

Original Article

     As you might read already in my previous  ESP8266 Battery Monitor System  post I was using Thingspeak.com, because of it's flexibility, as a logger for live data uploading.
In the latest week I was exploring deeper Thigspeak capabilities.

   As you know, Thinspeak.com it's a open source project, and you have full access to the project sources on Github 

   What I was interested for was to check the possibility to build/configure and use a standalone Thingspeak Server that can run independently of Internet infrastructure on a small footprint, low power consumption platform.
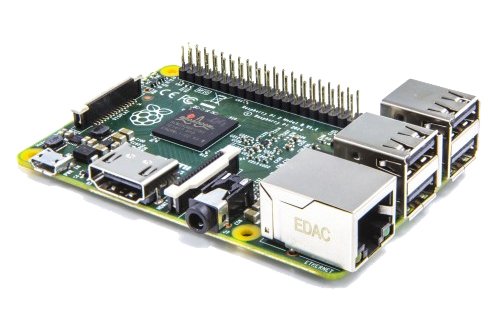
   The interesting part regarding the Thingspeak Server deployment is the chosen platform, the new RASPBERRY PI 2 Board!


    I will present you below the step-by-step process to install your own RPI Thingspeak Server that can be tailored on your own needs and ofcourse, not affected by Internet connection availability and uptime if installed in the same physical location/LAN as your ESP8266 BMS or any sensor grid/array you might want to use with!


INSTALLATION PROCESS:


1.  Install a Raspberry Pi Operating System image on SD card

  •  Download the Raspbian image from RPI website
  •  Write image to SDCard
    For more details please read RPI Install Guide

I was using the Win32DiskImager utility under W7Pro for that, worked like a charm.


2. First RPI RUN with the new SDCard:


  • Inset card in RPI2
  • Boot 
  • From raspi-config:
              - Set to use entire SDcard space
              - Set hostname: RPIMON1
              - Enable SSH Server
              - Write down your new RPI IP: 192.168.2.xx

  • Reboot for apply new hostname & settings
                pi@RPIMON1~$ sudo reboot


3. System Update & required packages install
  • Switch over to SSH remote access with Putty - accept new key


  • Change "pi" account password:
                  pi@RPIMON1~$passwd
  • Set ROOT password, so you can then use root (just for very, very special things!)
              pi@RPIMON1~$sudo passwd root

  • System Update & upgrade  :
              pi@RPIMON1~$sudo apt-get update            
              pi@RPIMON1~$sudo apt-get upgrade          
              pi@RPIMON1~$sudo apt-get dist-upgrade   
              pi@RPIMON1~$sudo sync

  • Reboot:
            pi@RPIMON1~$ sudo reboot


  • Required packages:
           pi@RPIMON1~$sudo apt-get -y install build-essential git mysql-server mysql-client 
                                       libmysqlclient-dev libxml2-dev libxslt-dev libssl-dev libsqlite3-dev


4.  MySQL Database configuration


pi@RPIMON1~$mysql --user=root mysql -p useyourpasswd here
pi@RPIMON1~$mysql> CREATE USER 'thing'@'localhost' IDENTIFIED BY 'speak’;
pi@RPIMON1~$mysql> GRANT ALL PRIVILEGES ON *.* TO 'thing'@'localhost' WITH GRANT OPTION;
pi@RPIMON1~$mysql> commit;
pi@RPIMON1~$mysql> exit;


5.  Ruby & Rails install

          pi@RPIMON1~$wget http://cache.ruby-lang.org/pub/ruby/2.1/ruby-2.1.5.tar.gz
          pi@RPIMON1~$tar xvzf ruby-2.1.5.tar.gz
          pi@RPIMON1~$cd ruby-2.1.5
          pi@RPIMON1~$./configure
          pi@RPIMON1~$make
          pi@RPIMON1~$sudo make install
          pi@RPIMON1~$cd ..
          pi@RPIMON1~$echo "gem: --no-rdoc --no-ri" >> ${HOME}/.gemrc
          pi@RPIMON1~$sudo gem install rails


 6.  THINGSPEAK SERVER INSTALL

pi@RPIMON1~$git clone https://github.com/iobridge/thingspeak.git
pi@RPIMON1~$cp thingspeak/config/database.yml.example thingspeak/config/database.yml
pi@RPIMON1~$cd thingspeak
pi@RPIMON1~$bundle install
pi@RPIMON1~$bundle exec rake db:create

pi@RPIMON1~$mysql --user=root mysql -p
pi@RPIMON1~$mysql> show databases;
pi@RPIMON1~$mysql> exit;


IF all OK continue with loading Thingspeak DB configuration

pi@RPIMON1~$bundle exec rake db:schema:load


RUN the THINGSPEAK SERVER:

pi@RPIMON1 ~/yourthingspeak $ rails server webrick


And the result in Browser:

Running Thingspeak on RPI Board

Create new Thingspeak USER:

Thingspeak Signup page


Create new CHANNEL

Create new channel for ESP8266 BMS data upload


Live Data update:

ESP8266 BMS  - Live data upload


UPDATE !! UPDATE !! UPDATE !! UPDATE !!

New fresh install instructions based on the new RASPBIAN Jessie: Raspberry PI2 + Thingspeak Server on RASPBIAN Jessie