ESP8266 Projects Blog
Home of CBDB / MPDMv4 /SmartMon Development boards (ESP-12/ESP-07).
Guidelines and ESP8266 programming examples using LUA, Eclipse and Arduino IDE, ESP Basic and many more!
PCA9685-16Channel 12-bit PWM I²C-bus LED controller Driver - Part 1
If you are looking for a very simple to use 16 Channel LED controller or
just for a nice 16 Channel, high resolution PWM driver then this one is
for you!
The PCA9685 is an I²C-bus controlled 16-channel LED controller optimized for
Red/Green/Blue/Amber (RGBA) color backlighting applications.
Driver implementation As been a I2C compatible device you need to have a standard I2C Bus Initialisation function as usual and also to know the I2C address of the device. For a more detailed hardware overview go to PCA9685 General Description Article.
Software:
1. Main program:
i2c.setup(4,5) 'choose your I2C bus pins
dev_addr = 64 '0x40 - I2C Address for the PCA9685
mode1 = 0 '0x00 location for Mode1 register address mode2 = 1 '0x01 location for Mode2 reigster address led0 = 6 '0x06 location for start of LED0 registers rst = 1 '0x01 reset device rval = 0 'read register value
led_on = 4096 led_off = 0
ledN = 0
dim led_stat(8) led_stat(0)=0 led_stat(1)=0 led_stat(2)=0 led_stat(3)=0 led_stat(4)=0 led_stat(5)=0 led_stat(6)=0 led_stat(7)=0
'check if proper initialised gosub [READ_REG] 'wprint rval if rval == "1" then status = true stat = "PCA9685 Init OK" else status = false stat = "PCA9685 Init Failure!" end if
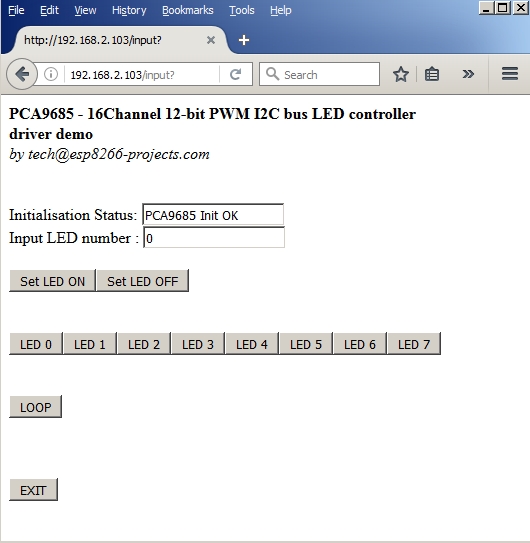
wprint " <b>PCA9685 - 16Channel 12-bit PWM I2C bus LED controller<br>driver demo</b><br><i>by tech@esp8266-projects.com</i><br><br><br>" wprint "Initialisation Status: " textbox stat
'set for auto-increment let data = 160 gosub [WRITE_REG]
'Choose below the desired output mode! 'Direct LED connection 'set to output mode INVRT = 1 OUTDRV = 0 reg = mode2 data = 16 gosub [WRITE_REG]
'External N-type driver 'write_reg(mode2, 0x04) -- set to output mode INVRT = 0 OUTDRV = 1
If you are looking for a very simple to use 16 Channel LED controller or just for a nice 16 Channel, high resolution PWM driver then this one is for you!
The PCA9685 is an I²C-bus controlled 16-channel LED controller optimized for
Red/Green/Blue/Amber (RGBA) color backlighting applications.
Each LED output has its
own 12-bit resolution (4096 steps) fixed frequency individual PWM controller that operates
at a programmable frequency from a typical of 24 Hz to 1526 Hz with a duty cycle that is
adjustable from 0 % to 100 % to allow the LED to be set to a specific brightness value.
All outputs are set to the same PWM frequency.
Each LED output can be off or on (no PWM control), or set at its individual PWM controller
value.
The LED output driver is programmed to be either open-drain with a 25 mA current
sink capability at 5 V or totem pole with a 25 mA sink, 10 mA source capability at 5 V.
The
PCA9685 operates with a supply voltage range of 2.3 V to 5.5 V and the inputs and
outputs are 5.5 V tolerant. LEDs can be directly connected to the LED output (up to
25 mA, 5.5 V) or controlled with external drivers and a minimum amount of discrete
components for larger current or higher voltage LEDs.
PCA9685 - Block Diagram
Features
16 LED drivers. Each output programmable at:
Off
On
Programmable LED brightness
Programmable LED turn-on time to help reduce EMI
1 MHz Fast-mode Plus compatible I²C-bus interface with 30 mA high drive capability
on SDA output for driving high capacitive buses
4096-step (12-bit) linear programmable brightness per LED output varying from fully
off (default) to maximum brightness
LED output frequency (all LEDs) typically varies from 24 Hz to 1526 Hz (Default of 1Eh
in PRE_SCALE register results in a 200 Hz refresh rate with oscillator clock of
25 MHz)
Sixteen totem pole outputs (sink 25 mA and source 10 mA at 5 V) with software
programmable open-drain LED outputs selection (default at totem pole). No input
function.
Output state change programmable on the Acknowledge or the STOP Command to
update outputs byte-by-byte or all at the same time (default to ‘Change on STOP’)
Active LOW Output Enable (OE) input pin. LEDn outputs programmable to logic 1,
logic 0 (default at power-up) or ‘high-impedance’ when OE is HIGH.
6 hardware address pins allow 62 PCA9685 devices to be connected to the same
I²C-bus
Toggling OE allows for hardware LED blinking
4 software programmable I²C-bus addresses (one LED All Call address and three LED
Sub Call addresses) allow groups of devices to be addressed at the same time in any
combination (for example, one register used for ‘All Call’ so that all the PCA9685s on
the I²C-bus can be addressed at the same time and the second register used for three
different addresses so that 1⁄3 of all devices on the bus can be addressed at the same
time in a group). Software enable and disable for these I²C-bus address.
Software Reset feature (SWRST General Call) allows the device to be reset through
the I²C-bus
25 MHz typical internal oscillator requires no external components
External 50 MHz (max.) clock input
Internal power-on reset
Noise filter on SDA/SCL inputs
Edge rate control on outputs
No output glitches on power-up
Supports hot insertion
Low standby current
Operating power supply voltage range of 2.3 V to 5.5 V
5.5 V tolerant inputs
-40 °C to +85 °C operation
ESD protection exceeds 2000 V HBM per JESD22-A114, 200 V MM per
JESD22-A115 and 1000 V CDM per JESD22-C101
Latch-up testing is done to JEDEC Standard JESD78 which exceeds 100 mA
For programming and uploading the driver and the software we will continue to use the LuaUploader as before.
Connection with the ESP8266 nEXT EVO Board is very easy, as PCA9685 Extension Board connector
is fully compatible with the nEXT connector. Depending on how to you
choose you socket type, you can install it on TOP or Bottom of the ESP8266 nEXT EVO Board :
PCA9685 16 Channel PWM Extension Board
Driver implementation As PCA9685 has a I2C compatible compatible interface, building a driver for it it's a pretty straigh forward process following the standard path for a I2C compatible device: 1 . I2C Bus initialisation function
function init_i2c(sda, scl) i2c.setup(id, sda, scl, i2c.SLOW) end
2 . PCA9685 Read register function
function read_reg(reg) i2c.start(id) i2c.address(id, dev_addr ,i2c.TRANSMITTER) i2c.write(id,reg) i2c.stop(id) i2c.start(0x0) i2c.address(0x0, dev_addr,i2c.RECEIVER) c = i2c.read(0x0,1) i2c.stop(0x0) rval = string.byte(c, 1) --print(rval) return rval end
3 . PCA9685 Write register function
function write_reg(reg, data) i2c.start(id) i2c.address(id, dev_addr ,i2c.TRANSMITTER) i2c.write(id,reg) i2c.write(id,data) i2c.stop(id) end
4 . Write 12bit values function
function write_12_bit(a) ah=bit.rshift(a,8) al=bit.band(a,0xff) --print(a,ah,al) return ah, al end
5 . PCA9685 initialisation function
-- LED_ON and LED_OFF are 12bit values (0-4095) -- ledN is 0-15
function init_pca() write_reg(mode1, rst) --reset device
if (read_reg(mode1)==0x01) then --check status status = true print("PCA9685 Init OK") else status = false print("PCA9685 Init Failure!") end --print(status)
write_reg(mode1, 0xA0) --10100000 - set for auto-increment -- choose here the desired output mode! --Direct LED connection write_reg(mode2, 0x10) --set to output mode INVRT = 1 OUTDRV = 0
--External N-type driver --write_reg(mode2, 0x04) -- set to output mode INVRT = 0 OUTDRV = 1
Another very popular and widely available module, used already in many Projects before, meeting the ESP8266 ecosystem :)
You can buy MAX7219 modules from Banggood, Amazon, Ebay, nameyourfavorite.com, quality and price might hugely vary from one to another so don't choose the cheapest one in town as you might find it as been not a very good deal to the end.
Description
The MAX7219 are compact, serial input/output common-cathode
display drivers that interface microprocessors (µPs) to 7-segment
numeric LED displays of up to 8 digits, bar-graph displays, or 64
individual LEDs. Included on-chip are a BCD code-B decoder, multiplex
scan circuitry, segment and digit drivers, and an 8x8 static RAM that
stores each digit. Only one external resistor is required to set the
segment current for all LEDs.
A convenient 4-wire serial interface connects to all common µPs.
Individual digits may be addressed and updated without rewriting the
entire display. The MAX7219 also allow the user to select code-B
decoding or no-decode for each digit.
The devices include a 150µA low-power shutdown mode, analog and digital
brightness control, a scan-limit register that allows the user to
display from 1 to 8 digits, and a test mode that forces all LEDs on.
Key Features
10MHz Serial Interface
Individual LED Segment Control
Decode/No-Decode Digit Selection
150µA Low-Power Shutdown (Data Retained)
Digital and Analog Brightness Control
Display Blanked on Power-Up
Drive Common-Cathode LED Display
24-Pin DIP and SO Packages
Typical Application Circuit
This is a 5V operation device. If you need to run it by the book at 3.3V Logic Level you will
need to use a level shifter. In practice, as you will see below, you can
try and run it directly, a bit out of spec. As MAX7219 HIGH logic level is at
3.5V...well...looks like it's working quite OK also in this way, in 48
hours of continuous running no freeze or strange behaviour:)
For programming and uploading the driver and the software we will continue to use the LuaUploader as before.
MAX7219 - CBDBv2 EVO Connection
Wire MAX7219 ESP8266
Green +5Vcc
Blue GND GND
Yellow DIN 13
White CS 12
Orange CLK 14
MAX7219 Driver Implementation
Timing Diagram
Initial Power-Up
On initial power-up, all control registers are reset, the display is blanked, and the MAX7219 enter shutdown mode.
Program the display driver prior to display use. Otherwise, it will initially be set to scan one digit, it will not decode data in the data registers, and the intensity register will be set to its minimum value.
Shutdown Mode
When the MAX7219 is in shutdown mode, the scan oscillator is halted, all segment current sources are pulled to ground, and all digit drivers are pulled to V+, thereby blanking the display.
Data in the digit and control registers remains unaltered.
Shutdown can be used to save power or as an alarm to flash the display by successively entering and leaving shutdown mode.
For minimum supply current in shutdown mode, logic inputs should be at ground or V+ (CMOS-logic levels).
Typically, it takes less than 250μs for the MAX7219 to leave shutdown mode.
A nice thing is the fact that the display driver can be programmed while in shutdown mode, and shutdown mode can be overridden by the display-test function.
Serial-Addressing Modes
For the MAX7219, serial data at DIN, sent in 16-bit packets, is shifted into the internal 16-bit shift register with each rising edge of CLK regardless of the state of LOAD. For the MAX7221, CS must be low to clock data in or out. The data is then latched into either the digit or control registers on the rising edge of LOAD/CS.
LOAD/CS must go high concurrently with or after the 16th rising clock edge, but before the next rising clock edge or data will be lost. Data at DIN is propagated through the shift register and appears at DOUT 16.5 clock cycles later.
Data is clocked out on the falling edge of CLK.
Data bits are labeled D0–D15.
D8–D11 contain the register address.
D0–D7 contain the data, and D12–D15 are “don’t care” bits.
The first received is D15, the most significant bit (MSB).
Digit and Control Registers
14 addressable digit and control registers.
The digit registers are realized with an on-chip, 8x8 dual-port SRAM. They are addressed directly so that individual digits can be updated and retain data as long as V+ typically exceeds 2V.
The control registers consist of decode mode, display intensity, scan limit(number of scanned digits), shutdown, and display test (all LEDs on).
Decode-Mode Register
The decode-mode register sets BCD code B (0-9, E, H, L, P, and -) or no-decode operation for each digit.
Each bit in the register corresponds to one digit.
A logic high selects code B decoding while logic low bypasses the decoder.
When the code B decode mode is used, the decoder looks only at the lower nibble of the data in the digit registers (D3–D0), disregarding bits D4–D6. D7, which sets the decimal point (SEG DP), is independent of the decoder and is positive logic (D7 = 1 turns the decimal point on).
When no-decode is selected, data bits D7–D0 correspond to the segment lines of the MAX7219/MAX7221.
Intensity Control and Interdigit Blanking
The MAX7219 allow display brightness to be controlled with an external resistor (RSET) connected between V+ and ISET.
The peak current sourced from the segment drivers is nominally 100 times the current entering ISET.
This resistor can either be fixed or variable to allow brightness adjustment from the front panel.
Its minimum value should be 9.53kΩ, which typically sets the segment current at 40mA.
Display brightness can also be controlled digitally by using the intensity register.
Digital control of display brightness is provided by an internal pulse-width modulator, which is controlled by the lower nibble of the intensity register.
The modulator scales the average segment current in 16 steps from a maximum of 31/32 down to 1/32 of the peak current set by RSET.
The minimum interdigit blanking time is set to 1/32 of a cycle.
Scan-Limit Register
The scan-limit register sets how many digits are displayed, from 1 to 8.
They are displayed in a multiplexed manner with a typical display scan rate of 800Hz with 8 digits displayed.
If fewer digits are displayed, the scan rate is 8fOSC/N, where N is the number of digits scanned.
Since the number of scanned digits affects the display brightness, the scan-limit register should not be used to blank portions of the display (such as leading zero suppression).
Display-Test Register
The display-test register operates in two modes: normal and display test. Display-test mode turns all LEDs on by overriding, but not altering, all controls and digit registers(including the shutdown register).
In display-test mode, 8 digits are scanned and the duty cycle is 31/32
function wrByte(data) i=8 while (i>0) do mask = bit.lshift(0x01,i-1) --print(mask) gpio.write( CLK, 0) -- tick dser = bit.band(data,mask) if (dser > 0) then gpio.write(DIN, 1) -- send 1 --print("1") else gpio.write(DIN, 0) -- send 0 --print("0") end --endif --print(dser) gpio.write( CLK, 1) -- tick i=i-1 end --while end
3. Set Register
function setReg(reg, value) gpio.write(CS, 0)
wrByte(reg) -- specify register tmr.delay(10) wrByte(value) -- send data
gpio.write(CS, 0) --tmr.delay(10) gpio.write(CS, 1) end
4. Convert anf Print integer number in xxxx format
function print_led_int(c) th = string.format("%d",c / 1000) h = string.format("%d",(c-th*1000) / 100) t = string.format("%d", (c-th*1000-h*100) / 10) u = string.format("%d", c-th*1000-h*100-t*10) --print(string.format("%d %d %d %d", th,h,t,u)) setReg(4, th) setReg(3, h) setReg(2, t) setReg(1, u) end
5. Create a Display 'ZERO' init stage
function zero_all() v=1 while (v<9) do setReg(v,0) v=v+1 end end
6. MAX7219 Initialisation
setReg(MAXREG_SCANLIMIT, 0x07) tmr.delay(100) setReg(MAXREG_DECODEMODE, 0xFF) -- full decode mode BCD tmr.delay(100) setReg(MAXREG_SHUTDOWN, 0x01) -- not in shutdown mode tmr.delay(100) setReg(MAXREG_DISPTEST, 0x00) -- no display test tmr.delay(100) setReg(MAXREG_INTENSITY, 0x00) -- set Brightness zero_all() -- set all to ZERO
7. Test Display - 9999 counter
count=0 tmr.alarm(0,1000,1, function() count=count+1; --print(count); print_led_int(count) if (count>9999) then count=0;zero_all() end end)